
Water Rescue Helmet Factory: Crafting Lifesaving Head Protection for Swiftwater Teams
2026-11-01
Swiftwater rescues don't allow second chances. That's why every helmet leaving our factory floor carries a weight beyond its grams—the trust of teams who face raging currents head-on. At Jianghe Flood Prevention, we craft lifesaving head protection with a simple belief: if it fails in the field, it wasn't worth building. In this post, we'll walk you through what goes into a helmet designed for the unpredictable, from impact-resistant shells to the small details that keep rescuers focused on the mission, not their gear.
What Really Goes Into a Swiftwater Helmet Before It Hits the Water
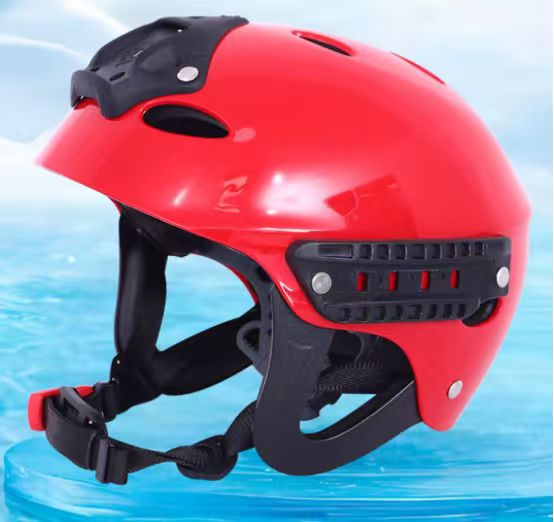
A swiftwater helmet starts as a few raw materials that seem almost too simple for the job: a polycarbonate shell, closed-cell EVA foam, nylon webbing, and a handful of stainless steel rivets. The shell gets heated and pressed into a mold that gives it the low-profile shape rescuers rely on when squeezing through strainers or under low branches. The foam liner is cut to fit the crown and sides, then bonded in place so it won’t shift even when soaked. Drain ports are punched through the shell at the rear and sides, letting water escape quickly after a swim or a wave hits.
Stitching and strap work happen next, and this is where a lot of helmets quietly fail. The chinstrap and rear stabilizer are sewn with box stitches and then anchored to the shell through reinforced holes, not just glued on. Buckles get tested for one-handed release with cold, wet fingers. Every helmet is dunked, flexed, and inspected for cracks or weak points before it gets a serial number. Some makers even run a sample from each batch through a drop test with a weighted headform to confirm the shell can take a hit against a rock and still protect the skull underneath.
Buoyancy matters more than people expect. The foam and shell together are tuned so the helmet floats high enough to keep a swimmer’s head up, but not so high that it pushes the chin back or makes the helmet ride up in moving current. That balance comes from trimming foam density and shell thickness during prototyping. By the time a swiftwater helmet ships, it has been molded, bonded, stitched, soaked, and knocked around—because the river will do all of that again on its first real run.
From Raw Polymer to River-Ready Shell: A Factory Walkthrough
The tour begins where sacks of polyethylene pellets sit stacked like pale gravel, each bead destined for a second life on moving water. A vacuum line draws them into the drying hopper, and from there they fall into the throat of a rumbling extruder. Heat and screw pressure reduce the polymer to a glossy, honey-thick melt, which is injected into a closed aluminum mold. Inside that mold, the real trick happens: the tool rotates on two axes inside a gas-fired oven, sloshing the molten plastic evenly across every contour until it skins the walls and cools into a single seamless hull.
Once the mold cracks open, the shell is still soft at the edges, carrying the faint warmth of its birth. Workers trim flash with hooked blades, then rout out hatch openings and drill rigging points with a steadiness that comes from repetition, not written instructions. The hull moves down the line to a bath where air pressure and soapy water reveal any pinholes. A flawed boat is recycled back into pellets, but most pass dry and go on to get outfitted with deck lines, seats, and grab handles—each part torqued by hand until it clicks into place.
Later, the finished shells are strapped onto a vibration table that simulates miles of rocky rapids, and then a few are actually dragged to the river behind the factory for a real-water float. It is not a laboratory; it is a proving ground where the scent of polyethylene still clings to the hull. By the time a boat is wrapped in foam and cardboard, it has already survived the equivalent of its first season. The walkthrough ends at the loading dock, but most visitors leave with the sense that they have just watched a raw material learn to become a vessel.
Why Drainage Holes and Low-Profile Ears Save Lives in Fast Current
Water always finds the weak points. In fast current, a helmet that traps water becomes a hazard. Drainage holes placed at the lowest points of the shell let water escape immediately after a swim or a wave breaks over your head. Without them, every gallon that stays inside adds weight and shifts the helmet forward, covering your eyes exactly when you need to spot the next eddy or strainer. Quick release of water helps keep the head upright and the field of vision clear, which matters more than most paddlers realize until they take a hit in a hole.
Low-profile ears are not about style. Bulky ear protection catches lines, branches, and rescue throw bags in moving water. If an ear guard hooks onto a rope or a limb, the current can torque the helmet and wrench the neck. A slim ear profile reduces those catch points without giving up protection. Modern designs shape the ear area to deflect rather than snag, letting the helmet slide past obstacles instead of grabbing them.
Together these features turn a helmet from passive gear into something that works with the water. Drainage keeps mass low and stable. Low-profile ears cut the chance of a sudden, violent stop. In fast current, seconds of clear vision and a helmet that does not catch can be the difference between a clean line and a serious swim.
The Impact Tests We Run That Most Buyers Never See
Behind every product that survives a clumsy drop or a rough collision is a battery of impact tests that remain invisible to the end user. In our lab, we slam prototypes into concrete, steel, and even irregular surfaces like gravel and asphalt—not once, but hundreds of times. We record the exact angle, force, and point of contact, then disassemble the unit to inspect for hairline fractures, loosened screws, or subtle deformations that might not show up in everyday use. Most buyers will never witness these deliberate acts of destruction, but every dent we map and every failure we provoke directly shapes the final design.
One test we rarely talk about involves dropping a fully loaded device from waist height onto a raised edge—like the corner of a curb or a stair tread. This targets the weakest structural points: corners, hinge areas, and seams where two materials meet. We run it at varying temperatures, from freezing cold to desert heat, because impact behavior changes dramatically with material flexibility. A plastic shell that shrugs off a drop at room temperature might shatter at -10°C. Buyers only see the final product, not the dozens of prototypes that cracked, snapped, or deformed during these edge-case scenarios.
There's also a repetitive micro-impact test that simulates months of being tossed into bags, sliding across tables, or bumping against keys and coins. We use a rotating drum lined with abrasive materials and hard plastic beads, then let the product tumble for hours—sometimes days—while sensors track cumulative stress. This test reveals weak points that single heavy impacts miss: paint chipping, button loosening, or internal connectors wearing out from constant vibration. It's the kind of slow, grinding wear that most buyers never think about, yet it's the difference between a product that looks new after a year and one that falls apart at the seams.
Custom Colors, Mounts, and Markings: Building for Your Crew
Finding the right shade for your group often starts with a single swatch and a lot of arguing. The color picker here doesn't limit you to a handful of presets; you can nudge the hue, pull the saturation down to a muted steel, or push it into something that glows under low light. Once you lock in a base tone, it carries across armor panels, saddle cloth, and the small trim details that most players never bother to adjust. That consistency is what makes a crew look like a crew instead of a random queue.
Mounts get treated like a badge of identity more than a way to move faster. You might keep a scarred drake for night runs and a smooth mechanical strider for daylight patrols, swapping between them depending on the mood of the squad. Some groups coordinate so that every rider uses a different class of mount but with the same accent color on the reins or engine glow. That small echo ties the lineup together without forcing everyone into the same silhouette.
Markings work best when they tell a story only your crew understands. A single stripe across the left shoulder, a faded chevron on the flank, or a ring of dots around the visor can mean something specific after a few weeks of running together. The tools let you layer these symbols without turning the whole design into noise, and you can save multiple templates for different roles within the team. New members usually start with a blank plate and earn the right to carry the full pattern after their first successful mission.
How Swiftwater Teams Push Our Helmet Design Forward
Working alongside swiftwater rescue crews isn't a box-ticking exercise for us. These teams spend hours in moving water, where a helmet has to do more than just sit on a head. They've shown us how water can force its way into vent channels and create drag that strains the neck. That kind of granular feedback comes only from people who rely on the gear when the current is fighting back.
One recurring request from instructors and technicians was for a lower-profile shell that wouldn't catch on throw bags or low branches. We spent two seasons testing revised ear coverage and a redesigned rear drainage system. The result is a helmet that sheds water faster after a swim and stays steadier during a live-bait rescue. Those tweaks may look minor on a spec sheet, but they change how the helmet behaves in a hydraulic.
Field notes from swiftwater teams also pushed us to rethink the retention system. Traditional buckles can clog with sand and grit after a few hours in a silty river. We moved to a simpler, glove-friendly adjustment that can be tightened one-handed while treading water. That's the kind of practical change that comes from listening to people who train in cold, fast water every single week.
FAQ
Rescue helmets are built around extended immersion and frequent contact with hard, unpredictable surfaces. They often use a thicker ABS or polycarbonate shell, multi-impact EPP or EVA foam, and a more secure four-point chin strap with a quick-release buckle. The shell usually has fewer snag points and may include a front brim designed to work with a headlamp or comms system.
We test beyond basic CE EN 1385 requirements. Prototypes are dropped onto flat, hemispherical, and edge anvils at multiple temperatures, including cold-soaked samples to mimic river conditions. We also run retention tests with wet straps and a pull test on the chin buckle. Some shells go through repeated low-energy impacts to check foam resilience before the final certification batch.
Yes. We handle short-run production for teams, including high-visibility orange, red, and yellow, as well as subdued tones for tactical units. Badges can be pad-printed, domed, or applied as reflective vinyl. We keep a digital proof process so teams see shell, vent, and strap color combinations before production starts.
For most rescue teams, a polycarbonate shell with a matte or lightly textured finish resists deep gouges better than glossy ABS. Polycarbonate spreads impact force well and doesn't crack as easily in cold water. The foam liner should be closed-cell EPP or EVA so it won't absorb water and degrade after repeated soakings.
Remove the liner if possible and look for cracked foam, shell delamination, or deformed rivets. Squeeze the shell gently around the impact area; any soft spots or creaking indicate hidden damage. If the chin strap shows fraying near the D-rings or the buckle cracked, replace those parts. When in doubt, retire the helmet—swiftwater environments don't forgive second failures.
Ear coverage helps protect against blunt trauma from branches, boat gunwales, and rocks, while still allowing water to drain quickly. Many teams need to run a communication earpiece or bone-conduction headset under the shell. We mold side cutouts and cable channels so teams can route wires without drilling holes that weaken the shell.
Yes. We keep replacement kits for every shell size, including comfort liners, chin straps, buckles, and rivet sets. Fleets often order extra visors and reflective stickers at the same time. We recommend swapping the chin strap every three years or after any serious entanglement, and replacing the liner if it no longer springs back after compression.
Measure head circumference with the hood on, then add about one centimeter if the hood is thicker than 3 mm. Use the rear dial or shim pads to fine-tune fit. The helmet should sit level and not slide backward when the chin strap is loose; a proper fit leaves room for a thin beanie underneath but no pressure points over the ears.
Conclusion
Inside the factory, a swiftwater helmet begins long before the first rescue call. Raw polycarbonate and ABS pellets are dried, melted, and injected into multi-part molds under pressure, but the real craft lies in what happens next. Drainage holes are not an afterthought—each one is positioned to shed water instantly while preserving shell integrity, and the low-profile ear sections are cut back to keep a swimmer’s hearing clear and reduce snag risk in fast current. Workers trim flash, sand edges, and inspect every vent before the shell moves to assembly.
The impact tests most buyers never see are far harsher than typical certifications require. Helmets are dropped onto angled steel plates, struck with blunt objects in cold water, and checked for cracks after repeated cycles. Beyond the lab, swiftwater teams shape the final product: they request custom colors that stand out in foam, specific mounts for lights and cameras, and markings that identify each crew member at a glance. Their feedback on buckle placement and strap tension feeds directly back into the next mold revision, so every production run reflects what rescuers actually face when the water turns violent.
Contact Us
Contact Person: Kristin Zhang
Email: [email protected]
Tel/WhatsApp: +8615366239752
Website: https://www.jianghecn.com/