

OEM Batch Off Cooler: A Practical Guide to Boosting Production Efficiency
2026-10-21
If your batch off cooler is just another machine in the line, you're missing one of the easiest levers for boosting production efficiency. This practical guide focuses on the OEM batch off cooler—not as a commodity, but as a critical control point where temperature, airflow, and handling either protect your compound or quietly create scrap and downtime. We'll skip the generic advice and go straight to adjustments that matter: from optimizing cooling time and belt load to spotting wear before it becomes a bottleneck. The goal? More batches out the door with less energy and fewer rejects. For teams ready to upgrade or replace equipment, SFC designs batch off coolers with these same field-tested priorities in mind.
Why Your Batch Off Cooler May Be the Quiet Bottleneck in Production
Batch off coolers rarely draw attention until production slows or quality drifts. They sit between the mixer and downstream handling, quietly setting the pace. When pellets leave at high temperature, even a small lag in cooling forces operators to throttle upstream flow, which quietly caps output. Over time, many plants treat this as normal, not as a hidden constraint.
The real issue often isn't the cooler's rated capacity but how it responds to changes in product type, ambient air, or moisture. A sticky or heat-sensitive formulation can reduce effective residence time, while a drop in cooling water temperature or airflow makes the exit temperature creep upward. Because the problem appears only as occasional soft pellets or erratic feeder behavior, it gets blamed on other equipment instead of the cooler itself.
Checking actual discharge temperature against the design curve, and comparing airflow pressure drop across the product bed, usually reveals the bottleneck. Small adjustments—like balancing air distribution or cleaning clogged perforated plates—can recover several percent of throughput without any capital spend. Ignoring it, though, means the cooler keeps eating into line efficiency while everyone wonders why the mixer never seems to run at full speed.
Sizing an OEM Batch Off Cooler for Real-World Line Speeds
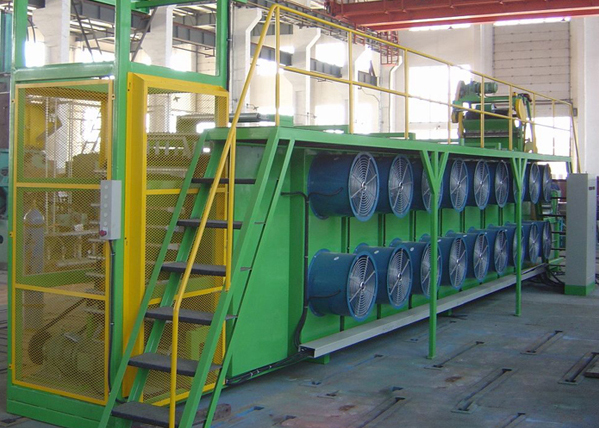
Choosing the right batch off cooler starts with a clear-eyed look at your actual line speed, not just the machine's rated capacity. Many processors rely on the nominal throughput printed in the datasheet, only to find that real-world conditions—warm ambient air, thick cross-sections, or inconsistent feed rates—force them to slow down the entire extrusion line. Instead, work backward from the pounds or kilograms per hour your downstream equipment can truly sustain. Factor in the specific heat of your polymer, the target exit temperature, and the cooling medium's inlet temperature. A cooler that's sized too tightly will become the bottleneck, while one that's oversized wastes floor space, energy, and capital.
One practical approach is to calculate the thermal load rather than relying on a simple tonnage rule. For a given throughput, determine how much heat must be removed per hour to drop the extrudate from its discharge temperature to a safe handling temperature. Then add a safety margin of 15–20% to account for production surges, summer temperature spikes, or occasional line stoppages that let material sit and reheat. Don't forget to consider the cooler's dwell time: a longer cooling chamber can run at a lower air velocity and still hit the same temperature drop, which reduces surface defects on soft or sticky compounds. Pair that with adjustable air nozzles or baffles so the same unit can be re-tuned when you switch materials or profiles.
Finally, validate your sizing with a short trial run if possible. Measure the actual discharge temperature of your hottest, thickest part at full line speed, then compare that against the cooler's stated performance curve. Look for uneven cooling across the batch width—this often signals that the fan placement or airflow distribution doesn't match your product layout. A well-sized OEM batch off cooler should hold its setpoint without the fans running at maximum, leaving headroom for those inevitable days when everything runs just a little faster than planned.
Temperature Control Tactics That Prevent Scrap and Rework
Scrap and rework rarely announce themselves with a single dramatic failure. More often, they build up quietly through small thermal swings that go unnoticed until a batch falls out of tolerance. One of the most direct tactics is to stop trusting the controller's display and start verifying actual melt or material temperature with a handheld probe at multiple points. In injection molding, a ten-degree drift in nozzle temperature can shift viscosity just enough to create short shots or flash, depending on the resin. Recording those readings over a few shifts usually reveals patterns that setpoint adjustments alone never fix.
Mold temperature matters just as much as barrel heat. Bringing a cold mold up to the resin's recommended surface range before the first shot prevents early rejects that come from uneven cooling, such as warpage, sink marks, or poor knit line strength. Conformal cooling channels, when feasible, keep the cavity surface within a tighter band than conventional drilled lines, especially around bosses and ribs. For machines that sit idle over a weekend, a slow ramp-up routine avoids thermal shock to heating elements and seals, which otherwise becomes an invisible source of variation.
Beyond fixed settings, real-time monitoring closes the loop. Attaching thermocouples to critical zones and logging data lets operators spot a cooling channel beginning to foul or a heater band losing contact before the next production run. Handheld thermal cameras can scan molds for cold spots in seconds, and the images give maintenance a clear target instead of a vague 'temperature problem' ticket. The payoff is not just fewer rejected parts; it is less time spent arguing about whether the process drifted or the tool is to blame.
Maintenance Habits That Outlast the OEM Warranty Period
The real test of a vehicle's longevity isn't the factory coverage it comes with—it's what you do after that paperwork expires. Too many owners treat the warranty period like a free pass, ignoring small leaks, odd noises, or slightly rough shifts until a major repair bill lands in their lap. Shifting your mindset from 'covered repairs' to 'preventive care' is the first habit that outlasts any warranty. That means learning the difference between an actual problem and normal wear, and not waiting for a dashboard light to make decisions for you.
Most people assume expensive parts like the transmission or engine are the first to go, but the items that quietly drain your wallet are often cheap to replace early: coolant hoses, serpentine belts, brake fluid, and cabin air filters. A habit of inspecting these every oil change—or at least twice a year—costs almost nothing and prevents cascading failures. For example, a $20 hose that bursts on the highway can warp a cylinder head, turning a simple fix into a four-figure repair. The owners who keep their cars past 150,000 miles aren't lucky; they just replace things before they break, not after.
Another underrated habit is documenting everything you do, even if you're not a mechanic. A simple notebook or phone note with dates, mileage, and what you replaced—along with receipts—creates a maintenance rhythm that most people abandon once the dealer stops sending reminders. It also helps you spot patterns: if you're topping off coolant every three months, that's a slow leak, not normal consumption. And when a shop tries to sell you a service you don't need, your own records are the best defense. Long-term reliability isn't about having a perfect car; it's about knowing your car well enough to catch small problems before they become expensive stories.
Retrofitting vs. Replacing: Making the Smart Call for Aging Coolers
Aging coolers often still have plenty of life left, but the decision to retrofit or replace them isn't always straightforward. Retrofitting can breathe new efficiency into existing equipment—upgrading fans, coils, or controls can cut energy use and extend service without the cost and disruption of a full swap. It's a practical route when the cabinet and structure are solid, and the main issues are outdated components or refrigerant.
On the other hand, replacement makes sense when the unit has chronic leaks, failing insulation, or a compressor that's on its last legs. Modern coolers come with better refrigerants, smarter defrost cycles, and tighter door seals that can slash operating costs dramatically. The smart call hinges on a careful look at repair history, energy bills, and how the cooler is used day to day—sometimes a few hundred dollars in retrofits beats a five-figure replacement, and other times the old unit is simply throwing good money after bad.
Facility managers should get a load of the total cost of ownership over the next five to ten years rather than focusing only on the upfront price tag. A retrofit may be cheaper now, but if it only buys another couple of years before major failures return, replacement starts to look better. The key is to assess the cooler's age, condition, and efficiency baseline—then weigh those against the performance gains from either path.
Simple Data Points That Reveal Batch Off Cooling Inefficiencies
A quick scan of the temperature drop between the batch-off entry and exit reveals more than most managers expect. If compound enters at 150°C and leaves at 45°C, but the dwell time remains fixed at three minutes, the cooling line is either over-ventilated or the water spray pattern has uneven coverage. Shift-to-shift logs of these two numbers often show a 10°C swing that never appears in equipment alarms.
Water flow per ton of batch is another underused signal. When one line uses 2,400 liters per ton while an identical line uses 1,900 liters for the same compound, the difference usually traces back to partially blocked spray nozzles or a belt speed that drifts upward over the day. Measuring the return water temperature adds clarity: a rise of only 3°C instead of the expected 7°C means the water is leaving before it can absorb enough heat.
Energy consumption per kilogram of cooled product closes the picture. Fans and pumps running at full speed on a lightly loaded belt waste power without improving final temperatures. Pair that with batch slab thickness readings—anything above a 5 mm variation from side to side creates hot cores that extend the cooling time by twenty percent or more. These are not sophisticated metrics, but they expose where the batch-off process is leaking time and money.
FAQ
It takes hot, freshly mixed rubber batches straight from the mill or mixer and cools them quickly while keeping each batch separated. The goal is to prevent sticking and scorching, so the material stays workable for downstream steps like storage, cutting, or extrusion. Without reliable cooling, you end up with fused lumps that waste time and compound.
OEM equipment is built around your specific line dimensions, throughput, and compound behavior. That means fewer workarounds, better fit with existing conveyors and dip tanks, and usually cleaner integration with your control system. A generic unit might be cheaper up front, but you pay for it later in misalignment, slower cooling, and more manual intervention.
Look for adjustable fan speed zones, a modular slat or bar design that reduces batch carryover, and an automated anti-stick spray or dip system that doesn't over-wet. Also pay attention to belt tracking and quick-release guards—these make cleaning and changeovers fast enough that they don't eat into production time.
Start by adjusting the belt speed and cooling air volume based on batch thickness and compound tackiness. Save those settings as named recipes in the HMI so operators aren't guessing every shift. For stickier compounds, increase the dip concentration slightly and add a few extra isolation bars rather than just cranking up the fan, which can dry out the surface unevenly.
Clean the fan blades and heat exchangers weekly—dust buildup silently kills airflow. Check drive chain tension and bearing temperatures monthly, and calibrate the temperature sensors every quarter. Also inspect the anti-stick spray nozzles for clogs; a partially blocked nozzle causes uneven coating and leads to sticking problems that look like a cooling failure.
If the frame, conveyor chain, and main drives are still solid, retrofitting can be a smart move. Upgrading to variable-speed fans, adding automatic batch separation, and replacing worn slats often restores a big chunk of lost efficiency for about half the cost of new equipment. But if the structure is corroded or the cooling tunnel is too short for your current output, a new OEM cooler avoids endless patch repairs.
Track energy used per ton of compound cooled, percentage of batches that stick together, unscheduled downtime hours, and operator time spent on manual separation. A well-tuned OEM cooler should show a steady drop in all four. Many plants see payback within 12 to 18 months from energy savings and reduced scrap alone, before you even count the gain in throughput.
Conclusion
Many production lines treat the batch off cooler as a simple utility, but it often hides the real constraint. When line speeds increase, a cooler sized for legacy rates forces operators to slow down or risk sticking and uneven cooling. Getting the sizing right means matching airflow, residence time, and batch depth to actual throughput, not just nameplate capacity. On the temperature side, small adjustments to water flow or air temperature can mean the difference between a clean drop and a pile of scrap. The best plants tune their coolers with the same discipline they apply to extruders or mixers.
Maintenance habits matter more than most OEM warranties assume. Routine checks on belt tension, fin cleanliness, and water strainer pressure not only extend cooler life but also prevent the slow drift in performance that often goes unnoticed. For aging units, retrofitting with modern controls or variable-speed drives can recover capacity at a fraction of replacement cost. And instead of guessing, simple data like discharge temperature, cycle time, and scrap rate by batch will show exactly where cooling is eating into your output. A cooler that runs cooler and steadier is not just a machine—it's a leverage point for the whole line.
Contact Us
Contact Person: Chen Zhengwei
Email: [email protected]
Tel/WhatsApp: +86-13963975727
Website: https://www.sfcrubbermachine.com